iOS 16 NavigationStack Tutorial
Navigation has always been a crucial aspect of SwiftUI, but as apps become more complex, developers may encounter challenges. To address this, at WWDC 22, a new API was introduced to simplify the process of building complex navigation flows. We will demonstrate this by creating a small list-based app and implement the new NavigationStack.
It can be complex to navigate the user back to the starting point once they are several screens deep in the flow. Also, when handling deep links, it can be hard to take the user to screen C for example, if the current flow is A -> B -> C -> D -> E. You can see the difference between NavigationView on the left and NavigationStack on the right in the video below.
SwiftUI Navigation - Before iOS 16
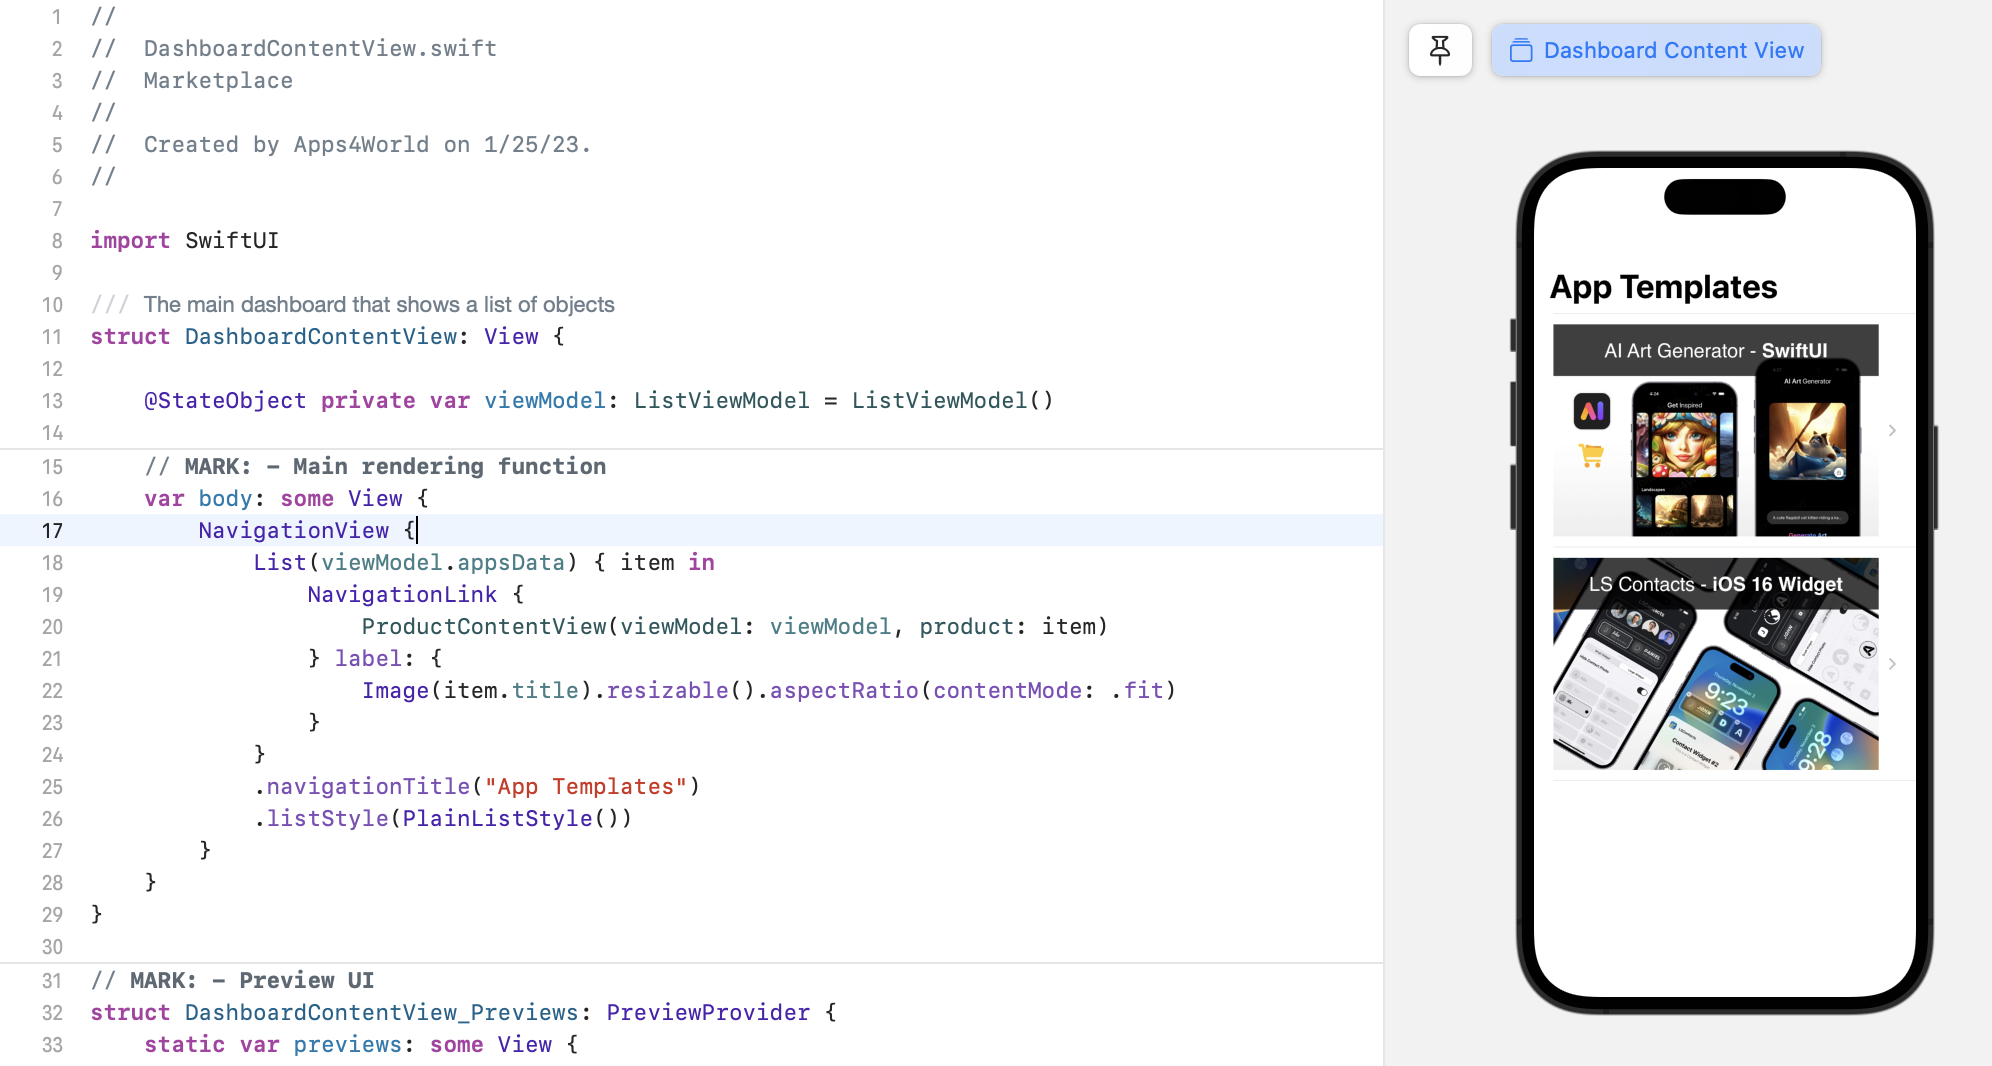
Prior to iOS 16, you would create a navigation interface using NavigationView and NavigationLink as shown in the example below. Which works very well if you have a simple and linear navigation.
In this tutorial, you will learn how to create a complext navigation flow in SwiftUI, using both the traditional method of NavigationView and NavigationLink, as well as the newer NavigationStack.
You can download the project that demonstrates the use of NavigationView from here.
Once the project is downloaded, open it, and take a look at the DashboardContentView and follow along with the instructions in the tutorial.
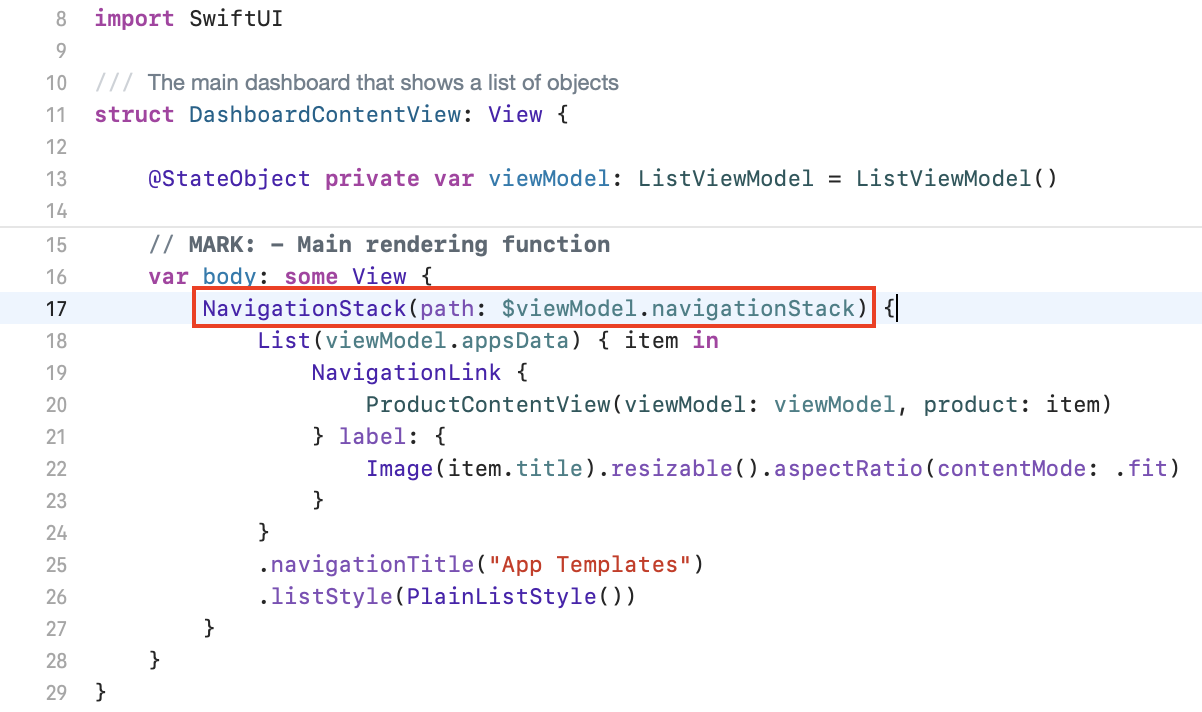
1) Replace the NavigationView with NavigationStack
Go ahead and replace the NavigationView on line 17 with NavigationStack(path: $viewModel.navigationStack), and don't be concerned about any error messages that may appear. You will address them in the next step.
It's crucial to understand that NavigationStack does not necessitate the use of a 'path' like in the above example, however, the path is a very useful array that makes NavigationStack so versatile. You can add new items to the 'path' or even replace it with new elements, resulting in a completely new navigation stack.
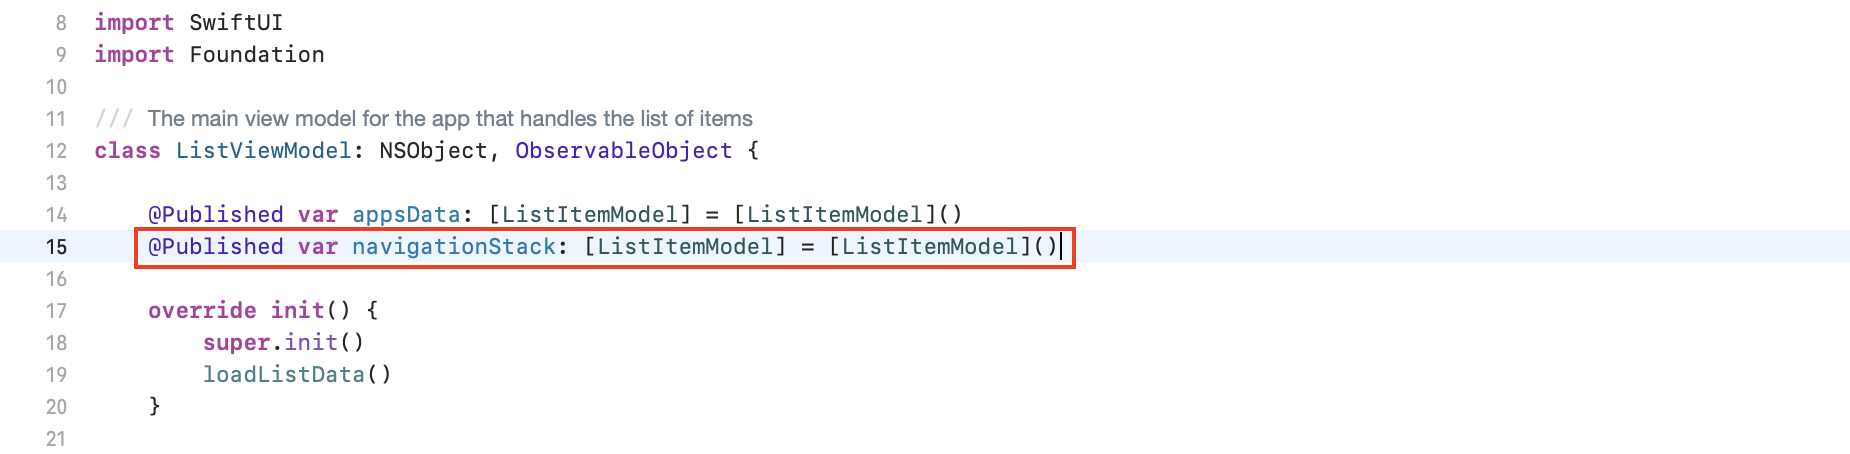
2) Mastering NavigationStack's path
Don't worry if you find the use of 'NavigationStack' and 'NavigationPath' confusing at first. The 'NavigationPath' is simply the data for the 'NavigationStack'. On line 17, you will see viewModel.navigationStack, which you need to declare in ListViewModel. Simply add the following line @Published var navigationStack: [ListItemModel] = [ListItemModel]() in the ListViewModel below '@Published var appsData: [ListItemModel] = [ListItemModel]()'.
With this new line of code, the error from step #1 should now disappear. The 'navigationStack' variable represents the items in the NavigationStack, which currently have none, but we will use it later in the tutorial.
3) Configure the .navigationDestination()
So far, everything should be working as before, nothing out of the ordinary. To fully take advantage of the 'NavigationStack', you will have to make a few minor modifications. This includes adding the .navigationDestination() and modifying the NavigationLink initializer. See the screenshot provided to understand the changes required in the DashboardContentView.
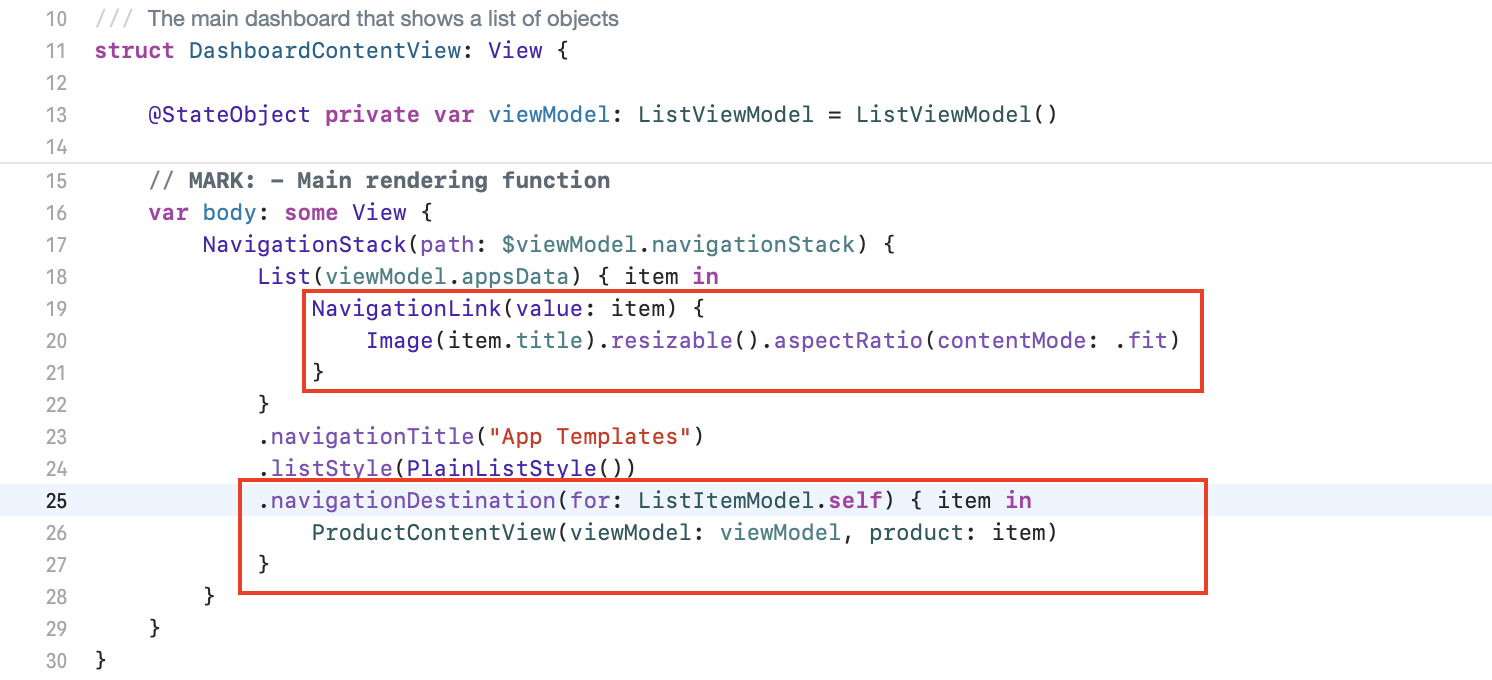
The key change made here is on line 25, which provides powerful options for displaying different destination views based on your own criteria for a 'ListItemModel'. On line 19, we had to update the 'NavigationLink' by providing it with a list item model. With these modifications, you can begin utilizing the '.navigationDestination' as needed.
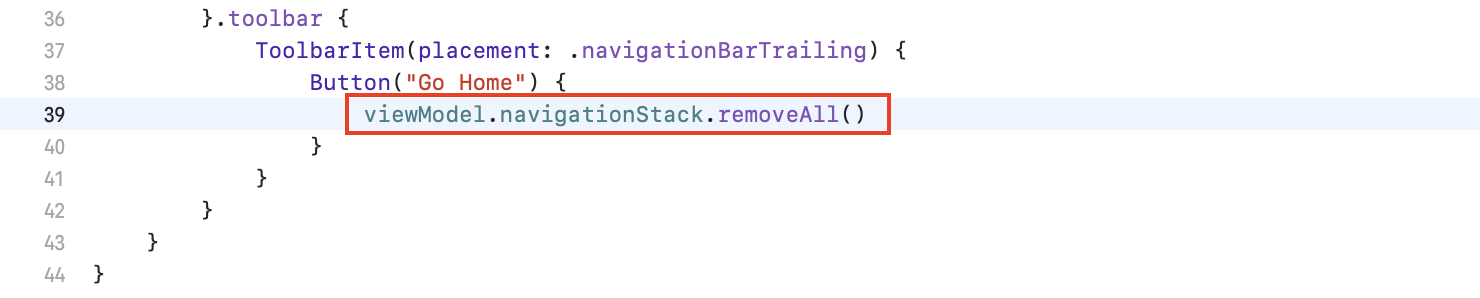
4) How to Pop to the Root View in a SwiftUI
This is a common question when it comes to SwiftUI navigation. Previously, there were various workarounds using NavigationView, but with the new NavigationStack, it's much more straightforward. To accomplish this, open the ProductContentView and replace line 39 with viewModel.navigationStack.removeAll(). It's that easy.
You may recall the 'viewModel.navigationStack' that you declared in step 2, this is where its power shines. By removing all items from the stack, you can easily navigate back to the root.
Conclusion
The NavigationStack, a new feature introduced in iOS 16, enables developers to efficiently create navigation UI that is driven by data. If your application does not need to support older versions of iOS, you can utilize this new component to manage deep linking and intricate user navigation.
You can download the project that demonstrates the use of the new NavigationStack from here.
If you want to make more money with your app, don't hesitate to send us an email at support@apps4world.com. We can help you create the most effective monetization strategy for your own iOS app.
Thank you for reading, and we wish you a lot of success with your app!